Vue + Node.js + Express + MongoDB 튜토리얼: MEVN stack CRUD Application (번역)
2022-05-17
- Vue
- Node.js
- Express
- MongoDB
- CRUD
아래 문서를 번역한 포스팅입니다.
원문: Vue.js + Node.js + Express + MongoDB example: MEVN stack CRUD Application
- 영어 실력이 미숙하여 번역이 완벽하지 않습니다.
- 덧붙이고 싶은 내용은 🗨 표시와 함께 정리하였습니다.
이 튜토리얼은 MEVN 스택으로(Vue.js + Node.js + Express + MongoDB) CRUD(Create, Retrieve, Update, Delete) App을 만드는 방법에 대한 내용입니다. 백엔드 서버는 REST API를 위해 Node.js + Express를 사용하고 프론트엔드는 Vue를 사용하며 Vue Router와 Axios를 함께 사용합니다.
더 깊은 내용: Node.js Express + Vue.js: JWT Authentication & Authorization example
백엔드와 프론트엔드에 대한 내용을 한곳에서 보고싶다면: How to serve/combine Vue App with Express
Firebase로 구현하는 Serverless:
Vue.js + Node.js + Express + MongoDB 프로젝트 훑어보기
아래와 같은 풀스택 튜토리얼을 앱을 개발할 예정입니다.
- id, title, description, published 이렇게 네개의 status를 가진 튜토리얼입니다.
- 사용자는 생성, 검색, 수정, 삭제를 할 수 있습니다.
- 제목으로 튜토리얼을 검색할 수 있는 검색창이 있습니다.
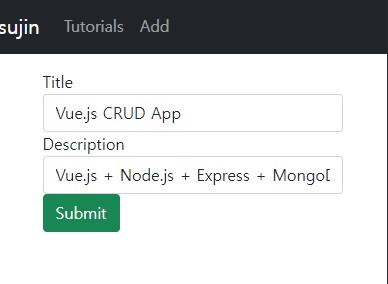
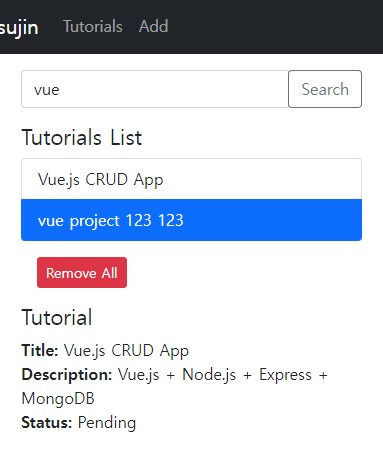
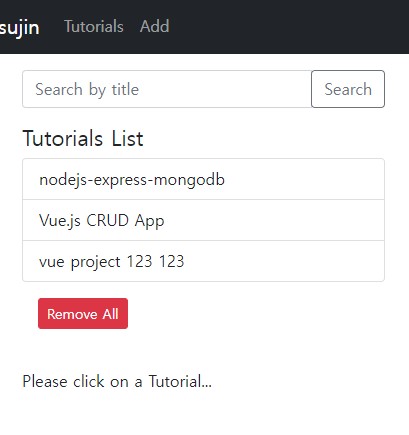
프로젝트의 스크린샷들입니다.
- 새 튜토리얼 추가하기
- 전체 튜토리얼 리스트 보기

- Edit 버튼을 클릭하면 리스트 내용을 수정할 수 있습니다.
(🗨 튜토리얼을 그대로 따라했을땐 edit 버튼의 텍스트가 흰색이고 배경 컬러가 없어 보이지 않았습니다. TutorialsList.vue의 edit 버튼에 임시로 컬러를 지정해줬어요. 아래 튜토리얼 상세 페이지에서도 버튼 컬러도 별도로 지정해주었습니다.)
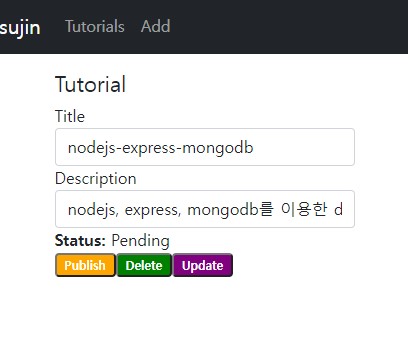
위 페이지에서 아래와 같은 것들을 할 수 있습니다.
Publish/UnPublished 버튼으로 status를 Published/Pending 할 수 있습니다.
Delete버튼으로 MongDB 데이터베이스의 object를 제거할 수 있습니다.
Update버튼으로 데이터베이스에 있는 object의 상세내용을 수정할 수 있습니다.
제목으로 리스트 검색하기
MEVN stack CRUD App 구조
아래와 같은 구조를 가진 어플을 만들 예정입니다.
- Node.js Express는 REST API를 exports하고 Mongoose ODM를 이용하여 몽고DB 데이터베이스와 상호작용합니다.
- Vue Client는 axios를 이용하여 HTTP 요청을 보내고 HTTP 응답을 검색합니다. 또 데이터를 components에서 사용합니다. Vue Router는 페이지 탐색에 사용됩니다.
백엔드 - Node.js, Express, MongoDB
Overview
Node.js Express App이 export할 API들 입니다. |Methods | Urls | Actions| |-|-|-| |GET | api/tutorials | 모든 튜토리얼 가져오기| |GET | api/tutorials/:id | id 값에 해당하는 튜토리얼 가져오기| |POST | api/tutorials | 새 튜토리얼 추가하기| |PUT | api/tutorials/:id | id 값에 해당하는 튜토리얼 수정하기| |DELETE | api/tutorials/:id | id 값에 해당하는 튜토리얼 삭제하기| |DELETE | api/tutorials | 모든 튜토리얼 제거하기| |GET | api/tutorials?title=[kw] | 제목 'kw'이 포함된 튜토리얼 모두 가져오기|
프로젝트 폴더 구조

- db.config.js는 몽고DB 연결 및 Mongoose에 필요한 파라미터 내용을 설정하여 exports합니다.
- server.js에는 CORS 설정, Express REST API 생성/실행같은 Express 웹 서버에 대한 내용이 있습니다.
- models/index.js에는 몽고DB 데이터베이스를 설정, models/tutorial.model.js에는 Mongoose 데이터 모델을 생성합니다.
- controllers에 프로젝트 controller가 있습니다.
- tutorial.routes.js에는 CRUD 핸들링과(custom finder 포함) 관련된 Routes에 대한 내용이 있습니다.
프로젝트 시작
Node.js App 생성
먼저 폴더를 생성하세요.
$ mkdir nodejs-express-mongodb
$ cd nodejs-express-mongodb
Node.js App을 생성하세요.
yarn initname: (nodejs-express-mongodb)
version: (1.0.0)
description: Node.js Restful CRUD API with Node.js, Express and MongoDB
entry point: (index.js) server.js
test command:
git repository:
keywords: nodejs, express, mongodb, rest, api
author: sujin
license: (ISC)
Is this ok? (yes) yes필요한 모듈을 설치합니다: express, mongoose, body-parser, cors.
yarn add express mongoose body-parser corsExpress 웹 서버 만들기
root 경로에 server.js파일을 생성합시다!
const express = require("express");
const bodyParser = require("body-parser");
const cors = require("cors");
const app = express();
var corsOptions = {
origin: "http://localhost:8081"
};
app.use(cors(corsOptions));
// parse requests of content-type - application/json
app.use(bodyParser.json());
// parse requests of content-type - application/x-www-form-urlencoded
app.use(bodyParser.urlencoded({ extended: true }));
// simple route
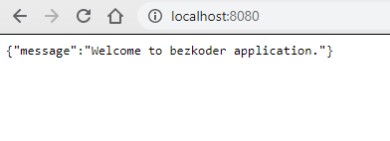
app.get("/", (req, res) => {
res.json({ message: "Welcome to bezkoder application." });
});
// set port, listen for requests
const PORT = process.env.PORT || 8080;
app.listen(PORT, () => {
console.log(`Server is running on port ${PORT}.`);
});express,body-parser,cors모듈을 import 했습니다.- Express는 Rest API 생성에 필요합니다.
- body-parser는
req.bodyobject에 대한 요청과 생성을 parse할 때 도움을 줍니다. - cors는 다양한 옵션과 함께 CORS를 가능하게하는 Express 미들웨어를 제공합니다.
- Express app을 생성하고
app.use()메서드로body-parser와cors미들웨어를 추가합니다. 오리진을 어떻게 설정했는지 확인하세요:http://localhost:8081 - 테스트를 위해 간단한 GET route를 설정합니다.
- 들어오는 요청들은 8080 port에서 듣습니다.
이제 node server.js 명령으로 app을 실행해보세요.
브라우저에서 http://localhost:8080/ 을 열어보면 아래와 같이 보일겁니다.
예~~ 첫번째 단계가 끝났습니다! 다음 섹션에서는 Mongoose를 이용한 작업을 해볼거예요.
MongoDB 데이터베이스와 Mongoose 설정
app/config/db.config.js 파일을 생성한 뒤 아래와 같이 내용을 작성하세요.
module.exports = {
  url: "mongodb://localhost:27017/bezkoder_db"
};
Mongoose 정의
다음 단계에서는 app/models/tutorial.model.js에 Mongoose model을 정의할거예요.
지금은 우선 app/models/index.js에 아래 코드를 작성하세요.
const dbConfig = require("../config/db.config.js");
const mongoose = require("mongoose");
mongoose.Promise = global.Promise;
const db = {};
db.mongoose = mongoose;
db.url = dbConfig.url;
db.tutorials = require("./tutorial.model.js")(mongoose);
module.exports = db;
server.js에 connect() 메서드로 요청하는것도 잊지말아요!
...
const app = express();
app.use(...);
const db = require("./app/models");
db.mongoose
  .connect(db.url, {
    useNewUrlParser: true,
    useUnifiedTopology: true
  })
  .then(() => {
    console.log("Connected to the database!");
  })
  .catch(err => {
    console.log("Cannot connect to the database!", err);
    process.exit();
  });
Mongoose Model 정의
model 폴더에 tutorial.model.js파일을 생성하고 아래와 같이 작성하세요.
module.exports = mongoose => {
const Tutorial = mongoose.model(
  "tutorial",
  mongoose.Schema(
    {
      title: String,
      description: String,
      published: Boolean
    },
    { timestamps: true }
  )
);
return Tutorial;
};
위 Mongoose Model은 MongoDB 데이터베이스에 있는 'tutorials'의 구조를 나타냅니다. 이 필드들은 각각의 tutorial에 대해 자동으로 생성될거예요. (_id, title, description, published, createdAt, updatedAt, __v)
아래와 같이요!
{
  "_id": "5e363b135036a835ac1a7da8",
  "title": "Js Tut#",
  "description": "Description for Tut#",
  "published": true,
  "createdAt": "2020-02-02T02:59:31.198Z",
  "updatedAt": "2020-02-02T02:59:31.198Z",
  "__v": 0
}
프론트엔드에서 __id가 아닌 id로 필드명을 사용해야한다면 toJSON 메서드를 사용하여 default object를 커스텀 object로 override해야합니다. Mongoose model을 아래와 같이 수정하면됩니다.
module.exports = mongoose => {
  var schema = mongoose.Schema(
    {
      title: String,
      description: String,
      published: Boolean
    },
    { timestamps: true }
  );
  schema.method("toJSON", function() {
    const { __v, _id, ...object } = this.toObject();
    object.id = _id;
    return object;
  });
  const Tutorial = mongoose.model("tutorial", schema);
  return Tutorial;
};
그러면 결과는 아래와 같아집니다.
{
  "title": "Js Tut#",
  "description": "Description for Tut#",
  "published": true,
  "createdAt": "2020-02-02T02:59:31.198Z",
  "updatedAt": "2020-02-02T02:59:31.198Z",
  "id": "5e363b135036a835ac1a7da8"
}
위 단계가 끝나면 우리는 CRUD 함수들을 따로 작성할 필요가 없어요. Mongoose Model이 모두 지원한답니다.
- 새 튜토리얼 생성: object.save()
- id값으로 튜토리얼 검색하기: findById(id)
- 모든 튜토리얼 검색하기: find()
- id값에 해당하는 튜토리얼 찾기 : findByIdAndUpdate(id, data)
- 튜토리얼 제거하기: findByIdAndRemove(id)
- 모든 튜토리얼 제거하기: deleteMany()
- 타이틀로 튜토리얼 검색하기: find({ title: { $regex: new RegExp(title), $options: “i” } })
이 함수들은 모두 우리 Controller에서 사용될거예요.
Controller 만들기
app/controllers 폴더에 tutorial.controller.js를 생성합니다. 아래 CRUD 함수들을 작성할거예요.
- create
- findAll
- findOne
- update
- delete
- deleteAll
- findAllPublished
const db = require("../models");
const Tutorial = db.tutorials;
// Create and Save a new Tutorial
exports.create = (req, res) => {

};
// Retrieve all Tutorials from the database.
exports.findAll = (req, res) => {

};
// Find a single Tutorial with an id
exports.findOne = (req, res) => {

};
// Update a Tutorial by the id in the request
exports.update = (req, res) => {

};
// Delete a Tutorial with the specified id in the request
exports.delete = (req, res) => {

};
// Delete all Tutorials from the database.
exports.deleteAll = (req, res) => {

};
// Find all published Tutorials
exports.findAllPublished = (req, res) => {

};
Node.js Express App을 계속해서 구현하고 싶다면 이 포스팅을 확인하세요. Node.js, Express & MongoDb: Build a CRUD Rest Api example
Node.js Express 서버 실행
node server.js 명령어로 앱을 실행해보세요.
프론트엔드 - Vue.js
Overview
App컴포넌트는router-view의 컴포넌트 입니다. routes paths 링크가 걸려있는 navbar가 있습니다.TutorialsList컴포넌트는 Tutorials를 가져와서 뿌려줍니다.Tutorial컴포넌트는:id를 기준으로 튜토리얼 상세정보를 수정할 수 있는 form들이 있습니다.AddTutorial컴포넌트는 새로운 튜토리얼 제출을 위한 form들이 있습니다.- 이 컴포넌트들은
TutorialDataService메서드를 호출하는데요,axios를 이용하여 HTTP 요청을하고 응답을 받습니다.
Technology
- vue: 3.0.0
- vue-router: 4.0.13
- axios: 0.27.2
프로젝트 폴더 구조
- package.json은 3개의 주요 모듈을 포함합니다:
vue,vue-router,axios. - 3개의 컴포넌트가 있습니다:
TutorialsList,Tutorial,AddTutorial. - router.js는 각 컴포넌트에 해당하는 routes를 정의합니다.
- http-common.js는 axios를 설정합니다. HTTP baseUrl과 header.
TutorialDataService컴포넌트에는 Api에 HTTP 요청을 보내는 메서드가 있습니다.- vue.config.js 에는 Vue Client의 로컬 서버 port가 정의되어 있습니다.
프로젝트 시작
Vue.js 프로젝트 생성
cmd 창에서 원하는 폴더 경로로 지정하고 커맨드를 입력하세요: vue create vue-js-client-crud
옵션을 선택하라고 나오는데 모두 default로 선택하세요. (원문은 Vue2를, 저는 Vue3를 선택했어요)
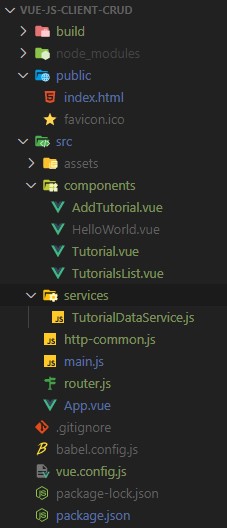
프로젝트 생성이 완료되면 아래 트리와 같이되도록 폴더와 파일들을 생성하세요.
public
  ㄴindex.html
 src
  ㄴcomponents
    ㄴAddTutorial.vue
    ㄴTutorial.vue
    ㄴTutorialsList.vue
  ㄴservices
    ㄴ TutorialDataService.js
  ㄴ App.vue
  ㄴ main.js
 package.json
public/index.html을 열고 \<head\>태그 내부에 bootstrap을 추가하세요.
<!DOCTYPE html>
<html lang="en">
  <head>
    ...
    <title>vue-js-client-crud</title>
    <link type="text/css" rel="stylesheet" href="//unpkg.com/bootstrap/dist/css/bootstrap.min.css" />
  </head>
  <body>
    ...
  </body>
</html>
Vue Router 추가 (Vue 3)
- 커맨드 입력으로 패키지를 설치합니다:
yarn add vue-router@next - src 폴더에 router.js를 생성하고 아래와 같이 Router를 지정해주세요.
import { createWebHistory, createRouter } from "vue-router";

const routes = [
  {
    path: "/",
    alias: "/tutorials",
    name: "tutorials",
    component: () => import("./components/TutorialsList")
  },
  {
    path: "/tutorials/:id",
    name: "tutorial-details",
    component: () => import("./components/Tutorial")
  },
  {
    path: "/add",
    name: "add",
    component: () => import("./components/AddTutorial")
  }
]

const router = createRouter({
  history: createWebHistory(),
  routes,
});

export default router- src/main.js 파일을 열고 router를 import하세요.
import { createApp } from 'vue'
import App from './App.vue'
import router from './router'
const app = createApp(App)
app.config.productionTip = false
app.use(router).mount('#app')
Navbar와 Router View 추가
src/App.vue를 열어봅시다. 이 App 컴포넌트는 우리 어플리케이션의 루트 컨테이너 입니다. 이 컴포넌트가 navbar를 가질거예요.
<template>
  <div id="app">
    <nav class="navbar navbar-expand navbar-dark bg-dark">
      <router-link to="/" class="navbar-brand">bezKoder</router-link>
      <div class="navbar-nav mr-auto">
        <li class="nav-item">
          <router-link to="/tutorials" class="nav-link">Tutorials</router-link>
        </li>
        <li class="nav-item">
          <router-link to="/add" class="nav-link">Add</router-link>
        </li>
      </div>
    </nav>
    <div class="container mt-3">
      <router-view />
    </div>
  </div>
</template>
<script>
export default {
  name: "app"
};
</script>
Axios 초기 설정
이제 커맨드를 입력해 axios를 설치하세요: yarn add axios
그리고 src폴더 내부에 http-common.js파일을 생성하고 아래와 같이 작성하세요
import axios from "axios";
export default axios.create({
  baseURL: "http://localhost:8080/api",
  headers: {
    "Content-type": "application/json"
  }
});baseUrl을 바꾸고싶다면 서버 정의에 있는 REST Api의 url도 바꿔야 하는 걸 잊지 마세요!
Data Service 생성
우리 서비스는 HTTP 요청에 axios를 사용할거예요.
services/TutorialDataService.js
import http from "../http-common";
class TutorialDataService {
  getAll() {
    return http.get("/tutorials");
  }
  get(id) {
    return http.get(`/tutorials/${id}`);
  }
  create(data) {
    return http.post("/tutorials", data);
  }
  update(id, data) {
    return http.put(`/tutorials/${id}`, data);
  }
  delete(id) {
    return http.delete(`/tutorials/${id}`);
  }
  deleteAll() {
    return http.delete(`/tutorials`);
  }
  findByTitle(title) {
    return http.get(`/tutorials?title=${title}`);
  }
}
export default new TutorialDataService();
Vue 컴포넌트 생성
이전에 말했던 것처럼, 우리는 3개의 라우터에 해당하는 3개의 컴포넌트가 있습니다.
- 새 리스트 추가
- 전체 리스트
- 리스트 상세
컴포넌트에 대한 자세한 내용은 이 포스팅에서 확인 가능합니다: Vue.js CRUD App with Vue Router & Axios
아니면 Vuetify를 사용하는 방법도 있어요: Vuetify data-table example with a CRUD App
Vue 로컬서버 실행
우리의 Vue App을 실행시켜봅시다: yarn serve
실행이 완료되면 브라우저에서 이 url로 접속할 수 있어요: http://localhost:8081/
(🗨 앞에서 만든 node.js express app의 로컬서버가 실행되어 있어야 데이터가 불러와 집니다.)
이제 확인해보세요.
소스 코드
이 튜토리얼의 Github 소스 코드를 확인할 수 있습니다: Vue + Node.js Github
결론
이렇게 Vue.js + Node.js Express + MongoDB로 만든 CRUD App에 대해 전반적으로 살펴봤습니다.
우리는 Express & Mongoose ODM를 이용하여 REST API를 위한 client-server 아키텍쳐에 대해서도 알아봤습니다. 또 HTTP 요청과 응답을 위한 프론트엔드 앱을 만들기 위해 Vue.js 프로젝트 구조에 대해서도 알아봤습니다.
다음 튜토리얼에서는 어떻게 시스템으르 실행하는지에 대해 더 자세히 알아보겠습니다.
- 백엔드: Node.js, Express & MongoDb: Build a CRUD Rest Api example
- 프론트엔드: Vue.js 2 CRUD Application with Vue Router & Axios
백엔드, 프론트엔드에 대한 내용을 한꺼번에 보고싶다면 이 포스팅을 확인하세요: How to serve Vue App with Express
TypeScript를 활용해 Vue App을 만들고 싶다면 요 포스팅을 확인하세요: Vue Typescript CRUD Application to consume Web API example
페이지네이션:
– Server side Pagination in Node.js, MongoDB | Mongoose Paginate v2
– Vue Pagination with Axios and API (Server Side pagination) example
https://www.bezkoder.com/node-express-mongodb-crud-rest-api/
https://www.bezkoder.com/vue-js-crud-app/
수정이 필요한 부분 혹은 더 나은 방법을 알고계신가요?
댓글로 알려주시면 저에게 큰 도움이 됩니다! 😊💜